Install a Permeable Pea Gravel Patio
Excavation depth, compacted crusher-run base math, heavy edging containment, and the 2-inch depth rule that prevents shifting.
Pre-flight briefing
Read this before you order a single yard of stone
Overview
Construct a clean, long-lasting permeable pea gravel patio that drains naturally and never feels like shifting sand underfoot. Learn how to grade the footprint, compact a 4-inch aggregate sub-base, anchor rigid commercial edging, and balance gravel depth to keep outdoor furniture level.
Estimated time
2 Days (Weekend Build: Day 1 Excavation, Grading & Compacted Sub-Base; Day 2 Heavy Edging, Geotextile Membrane & Gravel Dressing).
Add roughly 25 percent for a first attempt and a yard with awkward access.
Contractor pro-tip
Never install loose pea gravel directly over topsoil or standard black plastic mulch film. Round river stones act like ball bearings underfoot unless installed over a tightly locked, compacted crusher-run base and contained by rigid, mechanically anchored edging set 1/2 inch above the finished stone grade.
Tools checklist
- Square transfer shovel and trenching spade
- Vibratory plate compactor (or cast-iron hand tamper)
- 4-foot spirit level, line level, and high-visibility mason's line
- Heavy-duty wheelbarrow and steel landscaping rake
- Heavy-duty utility knife with fresh carbon-steel blades
- Dead-blow rubber mallet or hand sledge
- Garden hose with multi-pattern spray nozzle
Materials checklist
- Commercial-grade edging restraint (steel, heavy aluminum, or composite bender board)
- Non-woven needle-punched geotextile landscape fabric (4 to 6 oz weight)
- Crushed angular aggregate base (#57 stone or crusher run / ABC stone) — calculate ~50 sq ft per ton at 4" depth
- Washed, rounded 3/8" decorative pea gravel — calculate ~80-100 sq ft per ton at 2.5" to 3" depth
- 10" to 12" spiral steel landscape edging anchoring spikes
- Honeycomb gravel stabilization grid panels (optional, for high-traffic or dining zones)
Safety first — applies to the whole build
- Call 811 to locate buried gas, electric, and communications lines before beginning excavation.
- Wear steel-toe work boots, heavy leather work gloves, and eye protection when wheeling aggregate and driving steel spikes.
- Always wear hearing protection and vibration-dampening gloves when operating a mechanical plate compactor.
The build
Step by step
6 steps · 2 Days (Weekend Build: Day 1 Excavation, Grading & Compacted Sub-Base; Day 2 Heavy Edging, Geotextile Membrane & Gravel Dressing).
- 1
Footprint Layout, Pitch Calculation, and Excavation Depth
Saturday Morning (Site Prep)Call 811 before digging to mark underground lines. Outline your patio perimeter using high-visibility marking paint and drive wooden stakes at each corner. Set a mason string line to establish finished height and grade: establish a minimum 1/8-inch per foot slope (1 inch drop every 8 feet) slanting away from your home's foundation to direct storm runoff toward lawn or swale zones. Excavate the entire footprint to a total depth of 5 to 6 inches below your target finished grade. Clear out all organic sod, loose topsoil, and tree roots until you hit firm, undisturbed subsoil.
The costly mistake
Excavating only 2 to 3 inches deep and skipping the structural sub-base. Pouring pea gravel directly onto cleared dirt causes the stone to sink into native soil within months, creating a soft, muddy swamp after seasonal rains.
- 2
Subgrade Compaction and Non-Woven Geotextile Membrane
Saturday MiddayRun a plate compactor or hand tamper over the bare subsoil floor to eliminate hidden soft spots. Roll out heavy-duty non-woven geotextile fabric (minimum 4 to 6 oz rating) across the entire excavated basin, overlapping all sheet seams by at least 12 inches. Cut the fabric using a utility knife with hook blades so it runs 2 inches up the vertical perimeter walls. This heavy synthetic membrane allows vertical storm drainage while creating a permanent physical barrier that prevents base stone from sinking into clay and stops bottom-up perennial weeds.
The costly mistake
Using woven black plastic weed barrier or cheap perforated plastic film. Woven plastic frays, shreds under sharp stone weight, and suffocates the soil beneath while trapping surface water into an impermeable slick.
- 3
Installing the 4-Inch Compacted Crusher-Run Base
Saturday AfternoonWheel in dense-graded aggregate (crusher run, ABC stone, or road base) in two separate 2-inch lifts. Spread each lift evenly using a stiff steel bow rake. Lightly mist the stone with a garden hose nozzle to lubricate the rock fines, then make multiple overlapping passes with a mechanical plate compactor until the surface is rock-hard and rings under a hammer blow. This 4-inch compacted foundation provides the solid structural floor that stops pea gravel from feeling like deep, shifting beach sand when walked on.
The costly mistake
Dumping the entire 4 inches of base stone into the trench at once without compacting in stages. Single thick layers cannot achieve full-depth compaction, resulting in progressive settling and low spots beneath patio chairs.
- 4
Setting Rigid Containment Edging and Anchoring
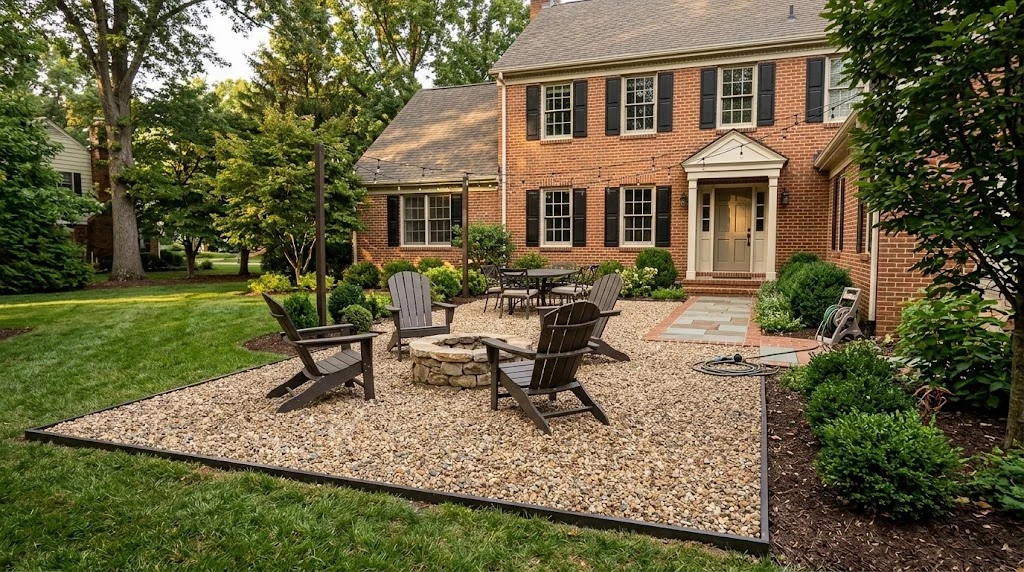
Sunday MorningPea gravel flows laterally unless restrained by an immovable perimeter. Install heavy-gauge commercial aluminum edging, treated timbers, or mortared natural stone along the boundary. For metal edging, drive 10-inch to 12-inch spiral steel stakes every 2 to 3 feet at an outward 45-degree angle to resist lateral push. Set the top lip of the edging exactly 1/2 inch higher than your planned gravel layer. This 1/2-inch reveal acts as a retention lip that keeps loose stones from kicking out into adjacent turf or flowerbeds during foot traffic.
The costly mistake
Setting edging flush or lower than the gravel surface. Stone will scatter across your lawn every time someone walks across the patio, turning loose pebbles into projectiles for lawn mowers and weed eaters.
- 5
(Optional) Stabilizing Grid and Washed Pea Gravel Dressing
Sunday MiddayFor a rock-solid walking surface that supports heavy patio tables, fire pits, and high-heeled shoes without rutting, lay interlocking honeycomb gravel stabilization mats over the compacted base. Spread washed 3/8-inch river pea gravel evenly over the surface to a maximum depth of 1.5 to 2 inches. Rake the stone smooth using the flat back of a bow rake, allowing the gravel to settle into the grid cells or evenly coat the dense foundation.
The costly mistake
Spreading pea gravel 3 to 4+ inches deep. Deep pea gravel produces a "quicksand" effect: boots sink to the ankle, rolling cooler wheels bog down, and patio chair legs wobble. A 1.5-inch to 2-inch layer provides full visual coverage while remaining firm underfoot.
- 6
Initial Watering, Stone Washing, and Furniture Setting
Sunday AfternoonThoroughly hose down the patio with a spray nozzle to wash residual quarry dust down through the permeable stone matrix into the base. This brings out the rich, natural river tones (amber, gray, cream, and flint) of the gravel. Walk the perimeter to inspect the edging reveal and tamp down any minor surface high spots with the flat side of a shovel. Place your fire pit ring, adirondack chairs, or outdoor dining set onto the surface, checking that table legs sit level across the stones.
The costly mistake
Installing unwashed gravel and leaving dry stone dust on the surface. Quarry dust cements into a sticky gray paste during initial rains, coating footwear and tracking muddy residue across decks and inside the home.
Contractor Referral Network
Decided this build is more than you want to tackle?
Excavating a footprint, hauling base aggregate, and running a plate compactor is heavy, dusty work. If you’d rather hand the digging, grading, and edging to a vetted local crew, get free, no-obligation estimates from hardscaping contractors in your area.
Free estimates • Zero obligation
Tools & hardware
Need additional equipment?
Explore our complete inventory of commercial mowers, trimmers, compactors, and hauling rigs.